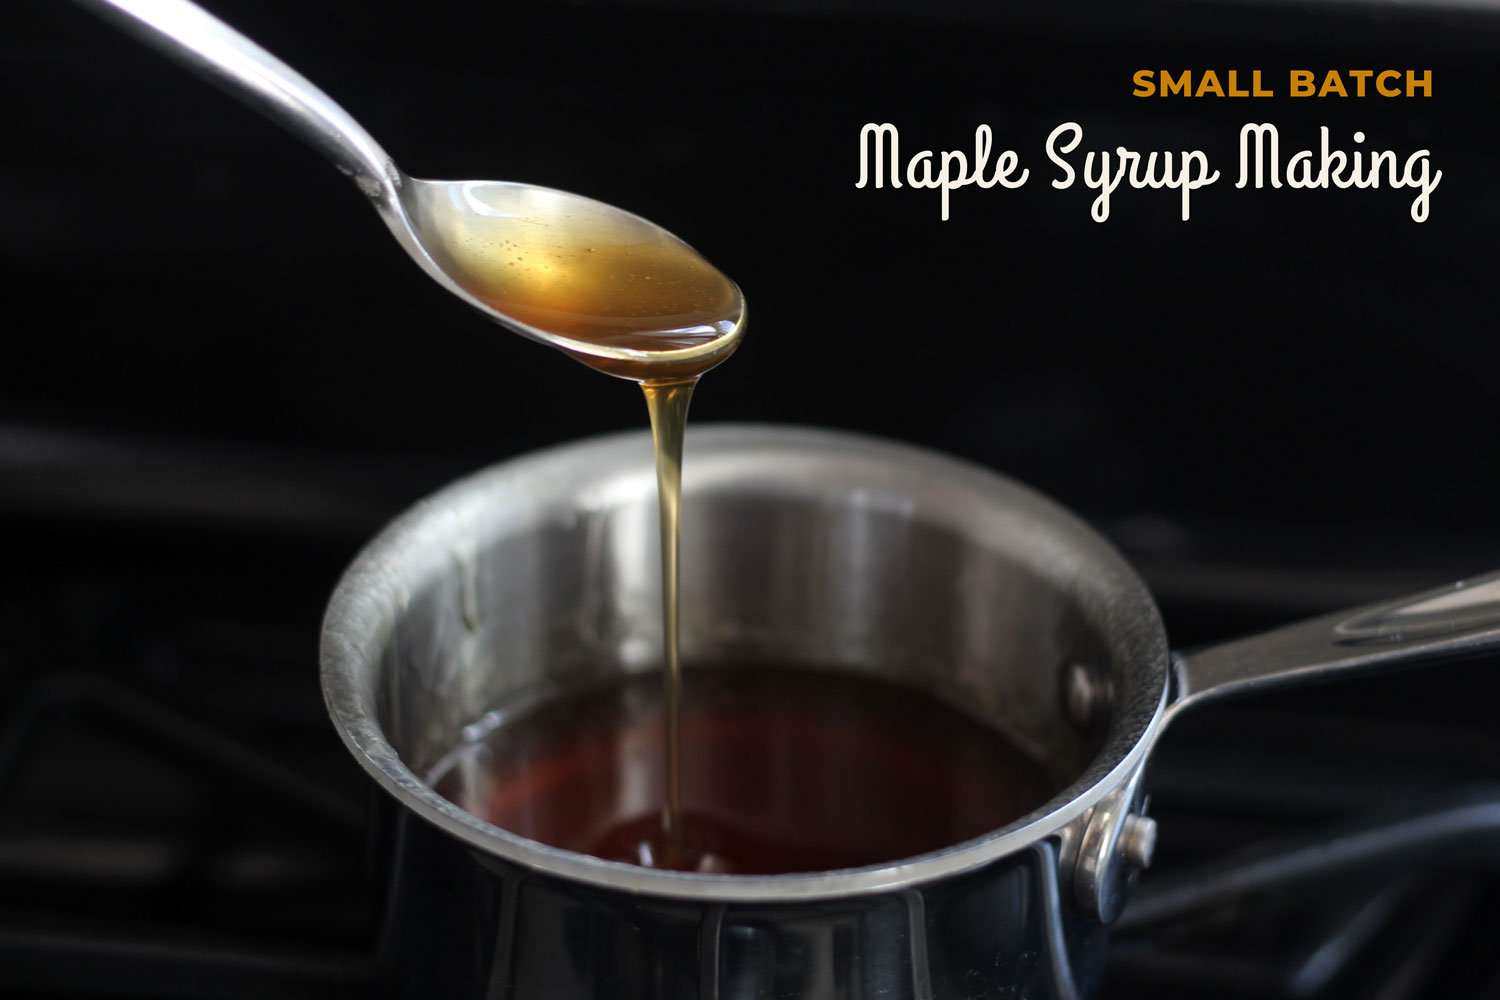
A few easy tips can save you money and many kitchen headaches when processing small batches of maple sap into syrup in your home kitchen.
We witnessed a rogue urban homesteader carting buckets of maple sap out of the nearby public woods a couple years ago. He was taking it home to process into maple syrup. “He’s going to boil that down in his kitchen?! That must take SO much energy to make just a tiny bit of syrup,” was my husband’s reaction. “He’s making his own maple syrup?! That’s SO cool! We should do that,” was my reaction. That pretty much sums up the difference between The Reluctant Farmer and I.
It’s true, it DOES take a lot of energy to make maple syrup. Energy costs are the biggest driver of pure maple syrup costs (and why it is so expensive.) Whether outdoors over a fire or at home in your kitchen, 40 gallons of sap needs to be boiled down to make 1 gallon of syrup. This is a practical challenge that transcends time. Surprisingly, even in the colonial days it didn’t make economic sense for many New Englanders who were maple sugaring.
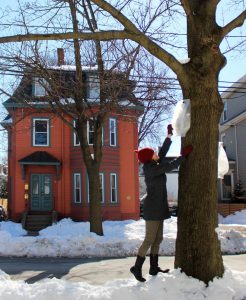
This spring we tapped the maple tree between our condo and the street. Our urban homestead had no outdoor space to process the sap. We experimented with many different methods to find the BEST, most ENERGY EFFICIENT way to process all that sap inside our kitchen. We tested many variables, measured the energy use, and calculated the costs of making sap by different methods. The most surprising thing to me was that it is indeed possible (and easy!) to make small batch maple syrup in your kitchen for comparable costs to a larger, scaled operation. I can’t speak to the largest of operators that use different technology.
How is sap made into maple syrup?
Turning maple sap into maple syrup involves two phases of transformation. (More practical details at bottom of page.)
- Evaporation — About 98% of the sap needs to be evaporated to concentrate the sugars. This step requires the majority of time.
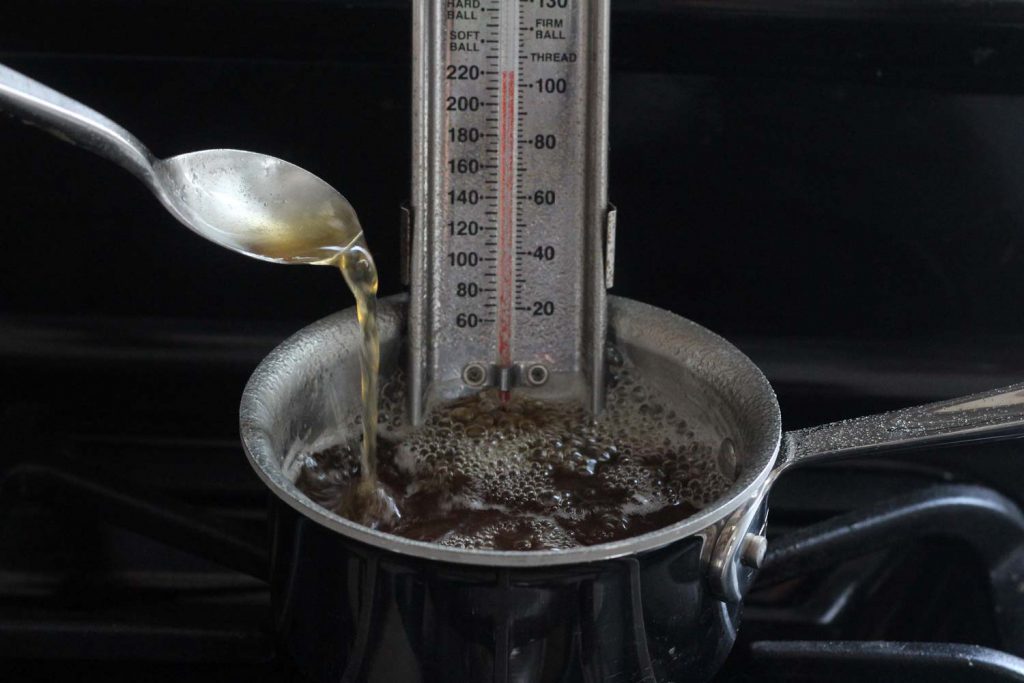
- Finishing — Once the water is evaporated to a 66-67% sugar concentration, the sugar starts to go through the molecular changes of candy making. Maple syrup is finished at roughly 7 1/4˚ above the boiling temperature. The browning reaction during finishing creates the familiar maple flavor. This step requires the majority of attention.
What are the options for making homemade maple syrup in my kitchen?
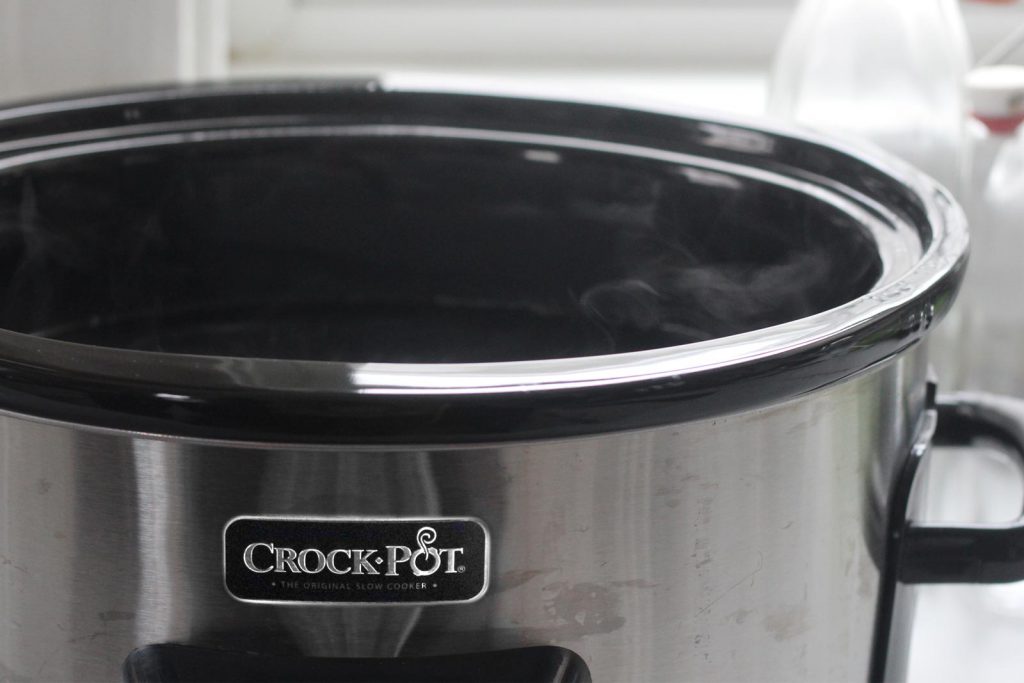
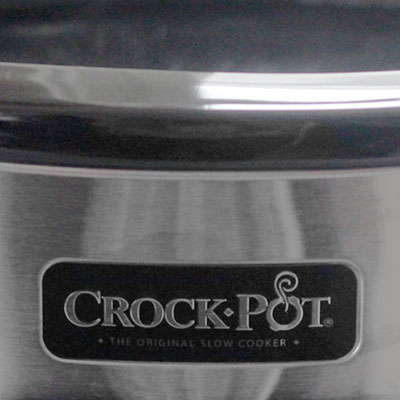
- Crock-Pot — It is possible to do the evaporation in your Crock-Pot or other slow cooker. (Make sure to completely remove the lid!) It is not ideal for finishing, since some slow cookers won’t get hot enough for the browning reaction and the retention of heat in the crock makes it difficult to quickly remove heat at the finishing point. The Crock-Pot is also the most energy-intensive and expensive way to process maple syrup.
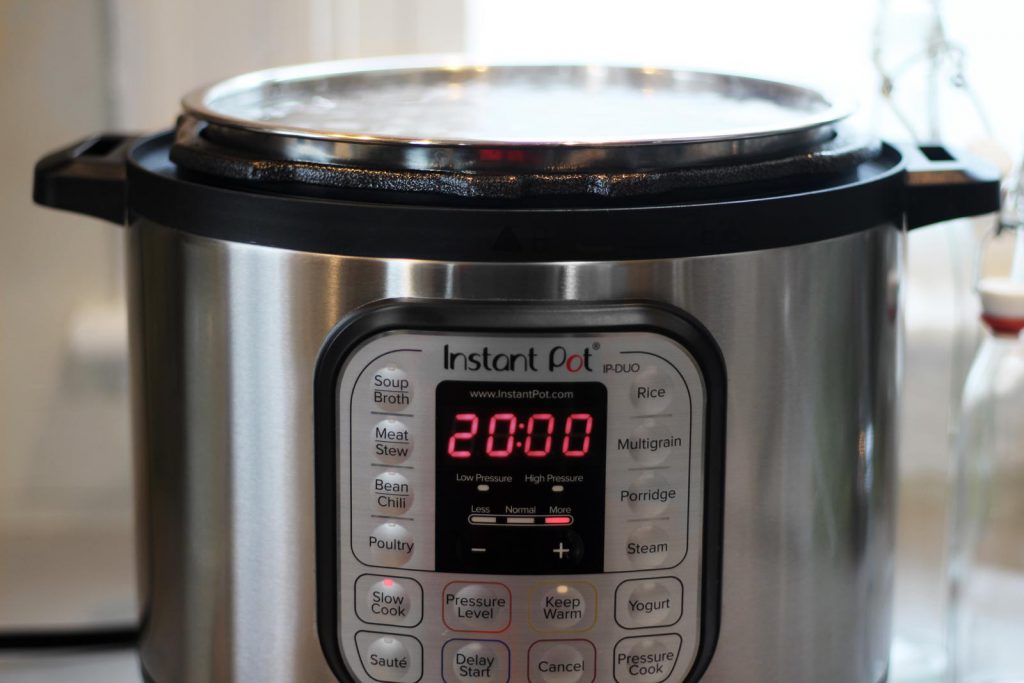
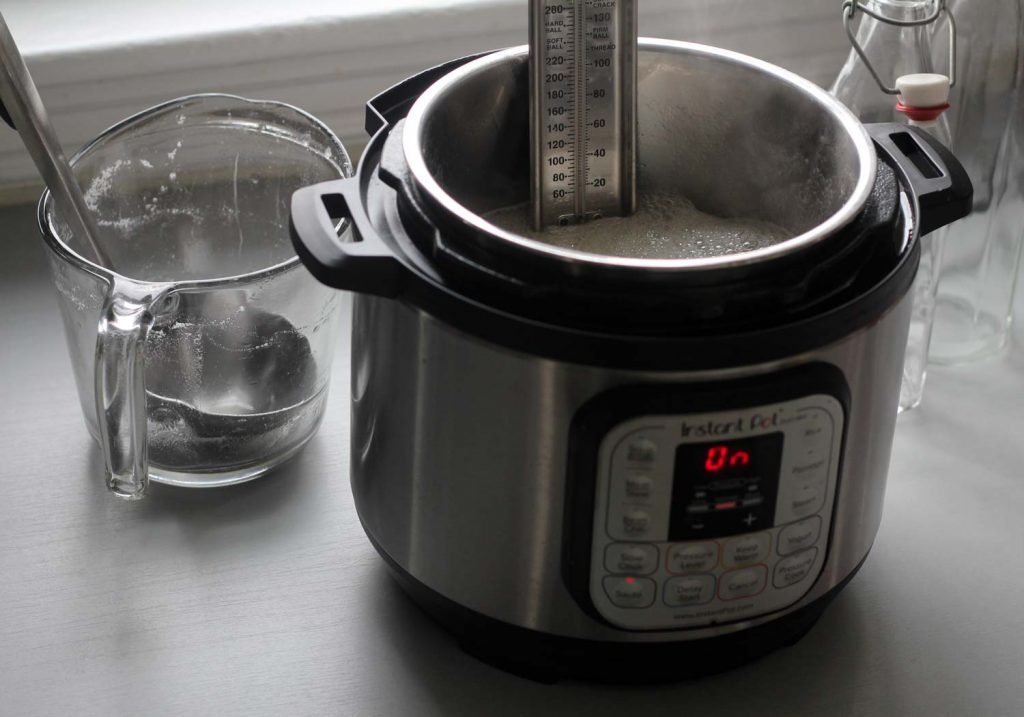
- Instant Pot — The Instant Pot used in slow cooker mode (without cover) will evaporate the sap. It is twice as energy-efficient as the Crock-Pot, but not as efficient as the gas stovetop. While it is possible to finish the syrup in the Instant Pot using the sauté mode, we don’t recommend. You risk ruining your Instant Pot if you get distracted for a few minutes and let it boil beyond syrup. (It can increase in volume very quickly and boil over, as I discovered firsthand.) Don’t have an Instant Pot yet? Here’s what you should know before you buy.
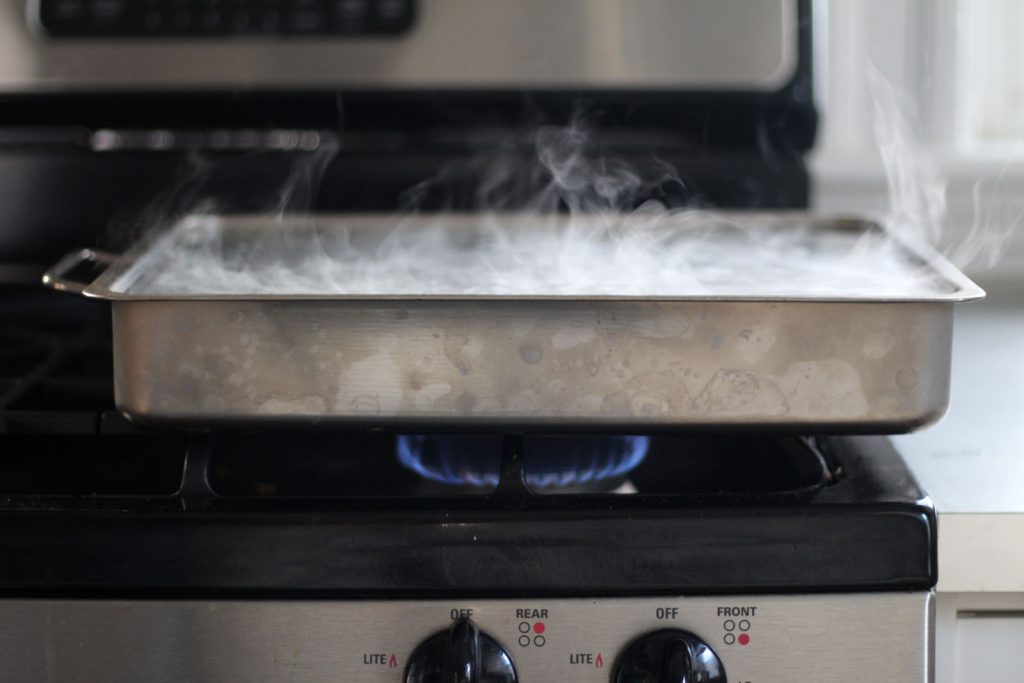
- Gas Stove — You can evaporate the water at a low to high setting and finish at a medium setting. A wide, shallow, roasting pan works best for the evaporation and a more compact pot is best for finishing. The stovetop is the most energy-efficient method of making maple syrup in the home kitchen.
How much does it cost to make small batch pure maple syrup in your kitchen?
In calculating costs we ignored the maple syrup tapping supply costs, since this investment can range from almost nothing (we spent less than $25 on our SmartBottle system) to a lot. You can also use the supplies year-after-year. We also ignored labor costs since at this scale it is just a hobby. We focused on the energy cost to process the sap into syrup, which you will continue to incur over and over with every batch made.
Time, Energy, and Cost to Evaporate 1 Gallon Maple Sap
CROCK-POT
26 hours
$$$
Notes: Crock-Pot set to high. Required 6 KWh electricity to evaporate 1 gallon. With our (high) electricity prices it would cost $55 to make 1 gallon of syrup (evaporate 40 gallons.)

INSTANT POT
11-12 hours
$$
Notes: Used sauté for first 30 minutes, then slow cook high. Required 3 KWh electricity to evaporate 1 gallon. With our (high) electricity prices it would cost $28 to make 1 gallon of syrup (evaporate 40 gallons.)

STOVETOP
3-6 hours
$
Notes: Shorter time and lower cost was with wide, shallow pan on medium. Required 22 cu. ft. natural gas. Longer time and higher cost was with round stockpot on medium. Required 32 cu. ft. natural gas. With our natural gas prices it would cost $15-20 to make 1 gallon of syrup (evaporate 40 gallons.)
For comparison, I found this analysis of the costs to set up and run a 150 tree sugar bush maple syrup operation in Vermont. The analysis found that it would cost $12 in fuel oil to make a gallon of maple syrup. It would take $15 in dry hardwood to make a gallon of maple syrup. I was pleasantly surprised to see that making maple syrup on a gas stove was roughly in this same range. (Your actual costs will depend on local energy costs.) If you’re doing this in your home kitchen you also have a lot of benefits over a sugar bush operation like the one described in this article. You don’t have to spend thousands on building a sugar shack or getting an evaporator. If you’re just doing a couple trees your collection process is much simpler too.
Making maple syrup might actually be something that makes economic sense to decentralize into the home kitchen!
Common mistakes to avoid when making maple syrup in your kitchen
Vigorously boiling massive amounts of sap in your kitchen can cause problems. “Never, ever make maple syrup in your home kitchen,” I was told by a neighbor. I also read about a number of bad experiences online. Digging deeper, it seems the common factor in these bad experiences is an attempt to vigorously boil the sap down as quickly as possible, often with multiple pots going at once. This creates a very steamy environment, which can peel paint off the walls and leave a sticky residue on all kitchen surfaces. My neighbor claims they still have sticky residue on some of their kitchen surfaces today. Following the tips and tricks recommended below we had no problems with humidity or sticky residue.
Tips and tricks for making small batch maple syrup in your kitchen
To keep energy use and costs down AND avoid environmental issues in your kitchen, we recommend the following tips:
- Low and Slow — Evaporating the sap at a lower temperature is the most energy-efficient and easy on your kitchen. It takes longer, but it maximizes the amount of energy channeled towards evaporation. The higher the flame, the more heat that escapes around the pan.
- Wide Surface Area — Evaporation only happens on the surface layer, so you want to expand the surface layer as much as possible. A wide and shallow roasting pan is much better than a tall round stockpot.
- Switch for Finishing — Finishing off requires precision and is better done in a round pan closer to the size of the flame so you don’t have varying temperatures across the pan (like you might with a wide roasting pan.) You need to be able to immediately remove the heat when it reaches the right temperature. (No cast iron pots that retain heat!)
- Watch Finishing like a Hawk — When maple syrup goes above the finishing temperature, it can very rapidly bubble, rise in volume and spill over (even when pan was only 1/4 full.) You need to pay VERY close attention when it is in this step.
How do I make maple syrup?
A gas stove is the most energy efficient and low cost way to make maple syrup. If you don’t have one, we recommend using the Instant Pot for evaporating and finishing on your electric stove. You can do this process all in one go if you saved up all your sap in a cool place to prevent it from going bad. Or, you can evaporate sap on a regular basis as you collect it and save the evaporated sap (takes up much less space!) in the fridge. When finishing off it’s best to have at least enough evaporated sap collected to be twice as high as the bulb on your thermometer.
Supplies needed:
- Maple sap
- Gas Stove
- Shallow, wide roasting pan
- Finishing pot relative to finished sap size
- Candy thermometer (we used this cheap thermometer — see note on thermometers)

Steps to making small batch maple syrup in your kitchen:
- Setting Up — Fill shallow, wide roasting pan with sap and turn gas flame on medium. It will take a while to heat up (maybe a half hour depending on volume) and you will start to see steam rising off the top.
- Evaporating — Continue to refill pan as sap evaporates (never let it get below a 1/2 inch) until the vast majority sap has evaporated. Shoot for a cup of sap left for every gallon and you won’t risk scorching your sap in the roasting pan. (It will start to take on a little bit more of a yellow-ish color.)
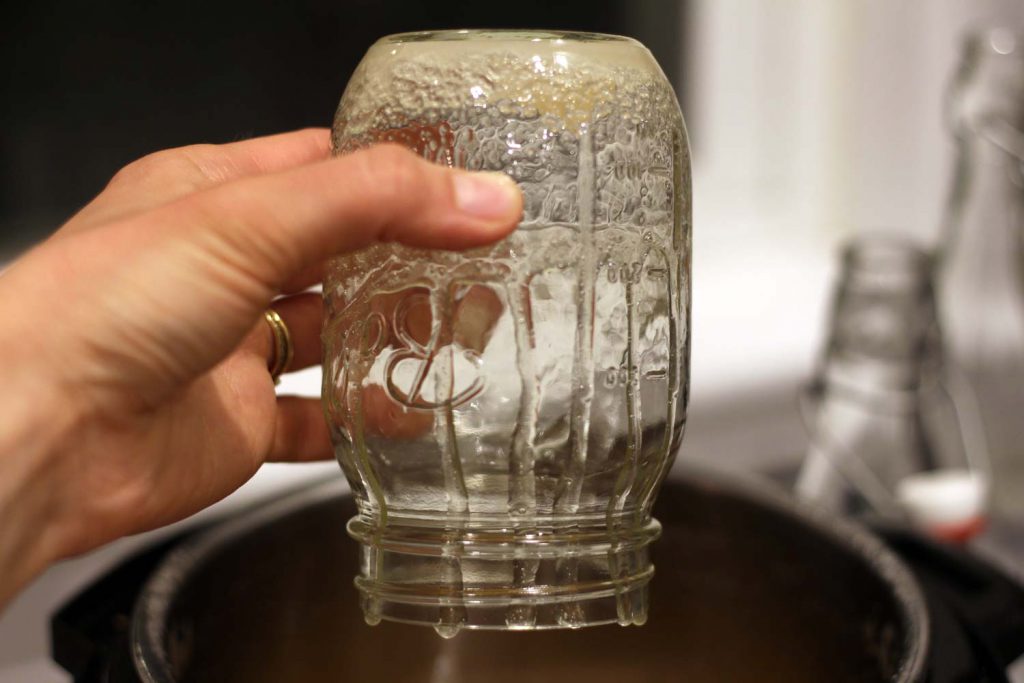
- Collecting — If you are evaporating sap in small batches, you can put this evaporated sap in a jar in the fridge until you have more evaporated sap to add to the finishing process. (The finishing process is easier when you don’t have tiny amounts.)
- Preparing for Finishing — Put all of your evaporated sap into a pot that is similar in size to the quantity of sap. Attach your candy thermometer to the side of the pot. (You want the sap to be plenty deep that even if it evaporates by half it will still cover the bulb of your thermometer.)
- Heating — Turn heat on medium and keep an eye on the thermometer as it climbs up to boiling.
- Watching — WATCH VERY CLOSELY at this point. The temperature will plateau when it reaches boiling (212˚ at Elevation 0) and continue to evaporate water. Once the sap reaches 66-67% sugar concentration the temperature will begin to rise again, beyond the boiling temperature.
- Finishing — Allow the temperature to climb a little more than 7˚ (7.25˚ to be exact) and turn off heat. Syrup should be brown and slightly more viscous. (It will get more viscous as it cools down. I put a little in the fridge to get a quicker sense of the final product.)
- Filtering — Optionally, you can filter hot syrup through a clean material such as wool or a coffee filter to remove “sugar sand.” You may lose a little syrup in the process, but if you don’t you’ll have some small sugar bits that will collect at the bottom of the jar. Some people enjoy the small sugar bits in their maple syrup, and the extra minerals may have some health benefits. I let it collect at the bottom of the jar. After pouring the syrup off I scraped it out and used it to sweeten some muffins.
Enjoy your homemade maple syrup! Since you made a small batch, you’ll probably be using it in the not-so-distant future. Findinstructions here for canning maple syrup if you made enough to preserver for long-term storage.
What if I let maple syrup evaporate or boil too long?
It is easy to do both these things, but don’t despair. My experience has shown them both to be salvageable. If you evaporate the sap beyond the 67% point before boiling it into syrup, it will crystalize and start to form rock candy. Just swish some water around in the crystals to dilute the sugar and carry on!
If you accidentally boil the syrup too long in the finishing off process or let it get too hot, it will start to get grainy. At this point you have two choices.
- You can let it keep going and make maple sugar (see instructions here.)
- You can simply add water to dilute it back to a lower concentration of sugar and try again.
Either way, don’t waste any of that precious sweetener!
Notes on Thermometers
There’s a couple issues you should be aware of regarding thermometers and your target temperature.
- The boiling temperature is not consistent everywhere and anytime. Boiling temperature is 212˚ at sea level, but it goes down by almost a degree for every additional 500 ft. of altitude. To make things even more confusing, it can vary in the same location based on changing barometric pressure.
- Cheap thermometers (like the one we bought) may not be well-calibrated!
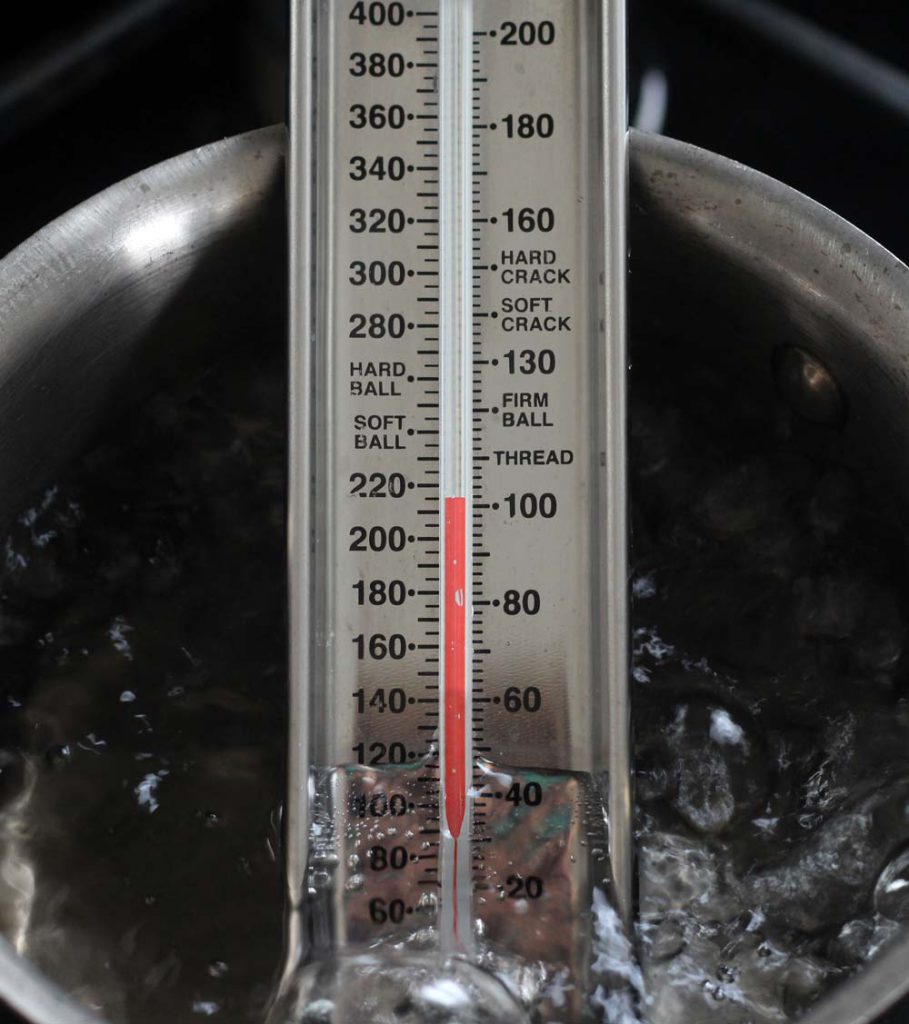
Don’t worry about these complications! Simply put your thermometer in a pot of boiling water prior to finishing your syrup to determine your local, current boiling temperature. Just add 7 degrees and a touch to get your finishing off point. (It doesn’t need to be precise to the tenth degree.) Also, when you are finishing, you will notice that the temperature keeps rising to a certain point where it plateaus. That is your local, current boiling temperature. (Once it starts heading up again just let it go 7 more degrees plus a tiny bit.)
To more precisely identify the finishing point you may want to buy a hydrometer, which measures the sugar content of the syrup. If you’ve tried the process once and want to make it an annual tradition, it’s a pretty small investment.
How to Finish Maple Syrup in Instant Pot
Evaporating your sap in the Instant Pot is simple and easy in slow cook mode (with no cover.) However, finishing your maple syrup in the Instant Pot is an entirely different matter. It is entirely possible, but after my experience I don’t recommend it! I got distracted for 2-3 minutes at just the wrong time and the temperature went beyond the finishing point for syrup. The volume expanded an incredible amount in a short amount of time and boiled over the sides. (The Instant Pot wasn’t even filled 1/4 full with syrup!) Of course the Reluctant Farmer jumped in, disassembled the whole thing, cleaned up the wires, and got the Instant Pot in working order again. I did get the whole told-you-this-was-a-bad-idea thing and I’m not sure he’s going to let me forget it!
If for some reason you still want to go ahead and finish your syrup in the Instant Pot I have some recommendations.
- First, prepare by having a ladle and bowl standing by in case it starts rapidly increasing in volume. If your syrup starts heading towards the edge you can quickly start bailing it with the ladle.
- With a little more research, I also uncovered a tip from this article on making maple sugar. (That’s what you’re starting to make if you let it go beyond boiling.) Ashley recommends rubbing a pat of butter around the pan about an inch above the maple syrup to stop the bubbles from going over that point. You could try doing that ahead of time as insurance!
- To finish syrup in the Instant Pot, just follow the steps in the above directions for the gas stove, but use the sauté mode on the Instant Pot instead.
- Quickly remove the Instant Pot liner from the Instant Pot when it is finished. (It will take a little while for the heating element to cool down and you don’t want your syrup to keep cooking.)
Did you try making maple syrup in your home kitchen? What method did you use and how did it go for you?
Sources of Inspiration
- Maple Days at Old Sturbridge Village
- Ox-Cart Man by Donald Hall and Barbara Cooney
- Little House in the Big Woods by Laura Ingalls Wilder

Denise E Johnson
27 Apr 2019Haha! I love it. Especially the reluctant farmer parts, very funny.
rachel frampton
27 Jan 2020My mom and I are fond of eating pancakes, of course, we would like to know more about making of the yummy maple syrup. I never knew that evaporation is possible through the use of Crock-pot. We’ll try our best to make our version, but for now, we’ll look for the best Grade a Vermont maple syrup.
Holly
14 Mar 2020Hi! This is my fist time tapping a maple, and it is exciting!!!
I couldnt have got this far without your clear instructions. Thank you!!!
I have boiled down the maple sap, and I am ready for the final process.
I am confused, and hoping you can clarify.
Here are your instructions:
“Watching — WATCH VERY CLOSELY at this point. The temperature will plateau when it reaches boiling (212˚ at Elevation 0) and continue to evaporate water. Once the sap reaches 66-67% sugar concentration the temperature will begin to rise again, beyond the boiling temperature.
Finishing — Allow the temperature to climb a little more than 7˚ (7.25˚ to be exact) and turn off heat. Syrup should be brown and slightly more viscous. (It will get more viscous as it cools down. I put a little in the fridge to get a quicker sense of the final product.)”
My question is:
If I put it in a pan as instructed, on a gas stove and boil it to 212 degrees, then watch it…do I leave the temp at 212? I dont understand the finishing part…allow temp to climb to 7…what temp is that? Or is it just that I check for consistency at this point?
Thank you!!!
The Inspired Wife
22 Mar 2020Hi Holly, I’m glad this was helpful to you and sorry it’s also confusing. I think this is confusing because the boiling temperature isn’t the same everywhere. It can be very different if you’re close to sea level, living high in the mountains, or somewhere in between. This is why I say let it climb 7.25 degrees over whatever your boiling temp is. So, for example, if you live at sea level, your boiling temp is 212 and you want it to go up to 219.25 degrees. If you live up in the mountains, these temps will be lower. (Another thing is your thermometer may not be calibrated just right, so that’s why I find it helpful to just watch and see when the temp stops going up for awhile, and that is your boiling point. You just mentally add 7 degrees to whatever that number is and then wait for enough evaporation to happen and your syrup will start rising in temperature again. You stop it when it gets to that number — 219 if you’re at sea level.) I hope this helps!
Kathy
2 Apr 2020Our family tried maple syruping this spring for the first time! Your post was very informative and inspiring, and gave me confidence to try a small scale operation on my kitchen stove. Great practical tips on how maximize efficiency and clear instructions for walking me through the process! My goal was 5 gallons sap with two cups of the final product. It was a success, although the two cups have been dwindling down rapidly. My four year old likes to say every time he eats some, “Yum! This tastes like tree” :-). At least now he knows where the syrup comes from!
The Inspired Wife
2 Apr 2020What a great experience for your 4 year old! I’m so glad this was helpful.
Lori Gabbert
27 Jan 2021Ive read some folks freeze it first to get rid of some of the water. Have you ever heard of this or tried it? Plan on tapping this spring.
The Inspired Wife
28 Feb 2021Hi! Yes, I have heard of this. As I understand it, only the water freezes (not the sugars), so you can just take those ice chunks out and you now have less liquid to evaporate to make your syrup. However, I did read that you will lose a little bit of the sugars this way, so I didn’t want to do it given my limited amount of sap. Good luck with the tapping!